Thursday, January 3, 2013

Chianti-braised stuffed chicken thighs

Welcome back everyone!! Time for some real food! I know I have been lazy with overnight oatmeal and fruit dip...lol The holidays are over and it's time to be back in the kitchen!

Tonight's dinner is two new recipes that I hope you enjoy. The potato recipe I will link here and vice versa with the chicken. So without further adieu...let's get cooking!!!

Here is the original recipe from Bon-Appatit.com on their site. Since there are only two of us I had to cut it down. I have had lap band surgery in 2008 so leftovers are hard for me to eat...but trust me the hubby is always willing to take any leftovers to work for lunch...if he doesn't eat it all for dinner. Hence the reason I cut the recipes in half..lol. I didn't have all of the exact ingredients but I had similar counter parts so I will list what I used here.

Ingredients:
    Filling:
  • 4 ounces bulk pork sausage unseasoned (I added some Italian seasoning for flavor and didn't cut amount in half since my chicken thighs were smaller)
  • 1/4 cup dried breadcrumbs plain and unseasoned
  • 1/4 cup grated Kraft Parmesan cheese
  • 1/3 cup finely diced red onion
  • 1/8 cup Egg Beaters
  • 1 Tablespoon dried parsley
  • 1 teaspoon dried thyme
  • 1/4 teaspoon salt
  • 1/8 teaspoon black pepper
  • 4 medium sized boneless skinless chicken thighs
    Sauce:
  • 1 Tablespoon olive oil
  • 1/4 cup bacon (ok so I didn't cut this ingredient in half...but can you blame me..wink)
  • 1/2 cup finely diced red onion (I love onions so I kept a bit more than half here too)
  • 3 garlic cloves minced
  • 1/2 750ml bottle of dry red wine (all I had was a basic Merlot it was still tasty though)
  • 1 1/2 cups low sodium chicken broth
  • 1 cup canned diced tomatoes
  • 1 bay leaf
  • 1/2 teaspoon dried basil
Directions:

Mix first 9 ingredients together in a medium sized bowl.


Place 1 thigh flat on your work surface. Take about 1 Tablespoons (mine was closer to 2 since I didn't cut down the sausage amount) of the filling mixture and roll into a log shape and place on the thigh towards either right or left short end. Roll the chicken thigh around the filling the best you can. Tie the chicken closed with cooking twine. I used two pieces to ensure that the filling stayed in the chicken. Stuff and tie up remaining thighs. Season the thighs with salt and pepper to your liking.


Heat olive oil in a heavy skillet (mine was a 10" skillet) over medium-high heat. Add bacon, saute until slightly browned but not crispy, just until the fat is rendered off (I left a bit of the fat on mine but it was completely cooked). Transfer the bacon to a paper towel on a plate to drain off excess fat from the bacon. LEAVE AS MUCH OF THE BACON DRIPPINGS IN THE PAN AS POSSIBLE!

Add chicken bundles to the drippings in the skillet. *I put mine open side down first this way as the stuffing warms up the cheese won't stick to the pan* Cook until golden on all four sides. *Now make sure you watch these and don't over cook them! The chicken will still need to cook later in the sauce for braising and you don't want the chicken all dried out. So just cook until you start to see a nice light browning on each side* Transfer onto a plate and set aside.


Add onion and garlic to the skillet. Saute until tender. *Don't over cook as garlic can burn and won't be tasty* Return the bacon to the skillet and add the wine. Boil mixture down until it is reduced by half (1/2 cup). *Easy way to know if you have reduced your mixture down by half...take a wooden spoon handle or something similar and place it straight down in the mixture and remove. Place a piece of tape just above where the sauce left a line. Wipe clean. Now when you place the spoon handle back in the sauce you can see if it has reduced down and by how much!*


Add broth, tomatoes, bay leaf, basil and chicken thighs and bring to just a boil. Reduce heat. Simmer uncovered until chicken is cooked through.


And the best part....plate and eat!!! Yummm! I paired this up with some whole potatoes instead of the noodles that the original recipe called for, as I can't eat pasta, or well shouldn't eat pasta...lol But the recipe for the potatoes is here. You can reduce the sauce down even further if you want it thicker by just turning up the heat again an boiling it down a bit more. Then pour over your noodles, potato, or just over the chicken if you wish. *Don't forget to cut the string from the chicken before you serve it unless you want to floss as you eat...wink lol.*

Here is the chicken (and potatoes) without the sauce so you can see how they stay together and the nice color of them. They are tender and juicy as they are but are so good with the sauce added over them!
Enjoy everyone and I would love to see any photos you have of your creations if you try this. You can also always ask me anything or comment on anything. I would love to hear from you!

Oven baked potates in chicken broth

Since tonight's dinner was full of lovely savory flavors I wanted something that would accommodate the sauce from the chicken that wasn't pasta. I didn't want to do a typical mashed, baked, or riced potato, and I didn't feel rice was a good pairing for it either. So awhile ago I had seen somewhere a recipe for cooking potatoes in the oven in chicken broth. Forgive me if I don't have a link to it (but if you are reading this and it's your recipe please let me know and I will give you full credit). So I thought it would be perfect! Such a great way to get dinner on the table and cooked all at once, potatoes in the oven and chicken on the stove!

So let's gather up our ingredients...

Ingredients:
  •  6 large baking potatoes peeled and washed (I used enough to fill my 8x8 dish)
  • Chicken broth 14 oz can (I used 2/3s of it but should have used only half or maybe a bit less)
  • 1 Tablespoon garlic or two cloves minced or smashed would work well too (I used minced garlic from a jar and used some of the juice that it's stored in)
  • 3 Tablespoons butter
  • salt and pepper to taste
Directions:

Preheat oven to 425 degrees F.

Place the potatoes in the baking dish so they fit in snugly but not crammed in there.


Add the garlic around the potatoes in the pan.

Season the potatoes with salt and pepper to your liking. (Hind sight I should have done this after pouring in the chicken broth, I had to re-season a bit)

Pour in the chicken broth to about half and inch up the dish (I did mine to an inch and it was too much liquid. It didn't give me the buttery baked crunchy bottoms I wanted but they were still tasty).


Top each potato with a slice of butter (use your own judgement on how much butter you like. If you're Paula Deen then honey grab the whole stick and have at it...lol)


Place uncovered in the oven and bake for 35-45 minutes depending on how big your potatoes are and how well done you like them. Fork test them at about 20 minutes and go from there. Mine I cooked for 35 minutes and the tops had a nice crust on them and the insides were fluffy and soft.

Take out of the oven and top with Parmesan or parsley for a simple touch or you can treat them like a regular baked potato. I ate mine just as they were with just an extra hint of butter...I guess I should have been more like Paula Deen when I cooked them lol.


Here is a link to the chicken I paired with them. Let me know what you think....and as always.....Enjoy!!!!

Wednesday, January 2, 2013

Caramel Cream cheese dip

My sweet tooth had attacked yet again today. I wanted something and for the life of me couldn't think of what. I had just bought some apples for the healthier eating habits I was trying for this year, but I still wanted something dessert type sweet. I had some caramel dip in the fridge but that was too sweet and too addicting. I had some cream cheese fruit dip but again that was sweeter than I wanted and I love that with my blackberries I had also bought. Can you see where my mind is going with this..lol

I decided upon a combination of the two but didn't want to combine them. Now in my pantry there are always dozens of choices. I had some individual wrapped caramels, but I didn't want to go to all of the trouble of melting them down and adding the butter to make the caramel sauce. So I look over and there is a bottle of caramel ice cream topping...mmm perfect! In the fridge is always blocks of cream cheese, a good go to protein for snacks for me when I want something not so good for me.


I whipped up the cream cheese with a hand mixer until it was light and fluffy. The easiest way for me to know when it's whipped light enough is when the cream cheese starts to pull away from the beaters. I started adding the caramel sauce as I whipped it and of course tasting along the way. The cream cheese had a nice caramel look to it but was a bit sweet as I got heavy handed with the caramel. So to cut the sweet a little bit I added some vanilla extract and some cinnamon. Mmmm perfect! It was just the perfect sweetness and dessert taste that I wanted not terribly healthy but I didn't need that much to satisfy my craving
 
 
Voila! This has so many possibilities to it for adding extra things to change the flavor. Right off the top of my head a few additions could be nuts, toffee bits, and chocolate. I'm not a huge cheesecake fan but I am a candy bar junkie :-) Anyway about 2 Tablespoons satisfied me with my apple. I'm thinking this would be yummy with a banana as well.
 
The ingredients:
  • 8 ounces cream cheese
  • 1/2 cup of caramel ice cream topping
  • 1 teaspoon vanilla extract
  • 1/2 teaspoon cinnamon
Enjoy!!


Monday, December 31, 2012

Overnight crockpot apple oatmeal


What better way to wake up in the morning than with a nice hot bowl of apple oatmeal...and not the instant packet stuff either. I am very picky about my oatmeal and don't like it too mushy or too chewy, but I saw this and I thought well why not give it a try. Besides if I don't like it...I can always pawn it off on the hubby...evil smirk...muwahahaha.

There are a few things that I would change but they are for my own personal preference. So before we get to that, here is the recipe :

  • 2 medium apples peeled and diced
  • 1/3 cup packed brown sugar
  • 1 teaspoon cinnamon
  • 2 cups oatmeal
  • 4 cups water
I prefer big pieces of apple in my oatmeal rather than small diced so I sliced mine. I also prefer more apples so I used 3 apples instead of the 2.
Place the apples in the bottom of the crockpot. There is no need to spray the crockpot with any kind of cooking spray but if you wish you can use a slow cooker bag to help with clean up.
 
I added the brown sugar like it said but think that it's not really necessary as I like to add my sugar after it's cooked...I can be a bit heavy handed on the brown sugar :-)
Add the brown sugar and cinnamon on top of the apples. I was surprised at how bland the oatmeal was with the 1/3 cup of brown sugar so I think next time I will leave it out and add the sugar later...but DO add the cinnamon! By adding the sugar later you can control how sweet or not you want it or if you want to sweeten with sugar substitute. It won't affect the cooking of the oatmeal if you omit the sugar.
 
I used old fashioned oats because of the cooking length and my finickiness about mushy oatmeal
Now add the two cups of oatmeal. The recipe didn't specify what kind of oats to use, but since it was going to cook over night I decided to use old fashioned oats rather than quick cooking ones so it wouldn't turn into wallpaper paste. After making this, I thought steel cut oats would be a lovely alternative.
 
Added the water.
Next add the water. Do not stir! Once the water is added put the lid on, turn the crockpot onto LOW and let cook for 8-9 hours, or give or take to your own liking. I found that 8 hours was plenty for me. Not to mushy but not chewy or gummy either.
 
Couldn't wait to try it, so sorry no pretty picture of it in a bowl garnished...lol. There is just enough leftovers for tomorrow..yeah!
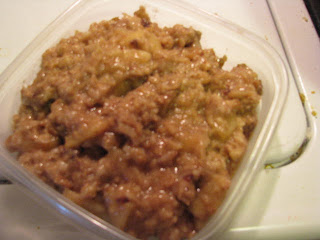
Oh the house smelled divine!!! Nothing better than waking up to the smell of apples and cinnamon! It's for sure a great way to make you smile...even on a Monday! This recipe makes a nice fairly large batch of oatmeal great for families. Since it's just the two of us we had some left over...but not much..lol. The container here holds about 2 cups.
 
It doesn't matter the type of apples used, I used fuji because it's what I have on hand all the time but if you prefer a granny smith for a more tart apple that would work fine too. I used light brown sugar but dark brown sugar could be used as well for a richer deeper molasses or carmelish flavor. Again with the oats, my personal preference was the old fashioned but any kind would work well just be mindful of cooking times. Other things would be lovely added to this as well like dropping in 1/3 cup of raisins, dried cranberries, or any other type of dried fruit you enjoy. This recipe is so versatile and easy even the kids could join in and make it their own.
 
I hope you enjoy it and I would love to hear the different variations that you all come up with.